
Email marketing is an important aspect of any website as there are numerous benefits from using it. In this post, we will look at what those benefits are, as well as how to set it up for your site using AWeber.
What Is Email Marketing?
Email marketing is a broad term to describe the process of creating an email list for your site. You use this email list to help promote your content and products.
In order for this to work, you need to allow (and encourage) people to subscribe to your site. This way, they join your email list, allowing you to email them with information that they find interesting. The more people you have signed up to your email list, the better.
You see, the people on your email list are your best customers. They have visited your site and found it interesting enough to subscribe for more content. For that reason alone, they are much more likely to listen to any offers you may send them (affiliate promotions, product sales, discount coupons, etc.). Having a large email list can actually be quite profitable, which is why bloggers and website owners hold them in such high regard.
It’s not just about money though, email lists are great sources of traffic. You can send out an update from your site (maybe after publishing a new post or sending out a regular newsletter), which helps to encourage people back. This way, you know that you have a dedicated core group of people coming back repeatedly to your site.
Isn’t Email Marketing Spam?
Short answer – no!
Email marketing is NOT spam because of two key reasons.
- People signup themselves.
- They are free to unsubscribe at any time.
You shouldn’t be adding anyone to your email list who hasn’t subscribed themselves. Only the people who CHOOSE to subscribe will be sent anything. Even then, they can unsubscribe at any time to stop receiving updates. Try to clearly explain what people are subscribing to and they will not be surprised when they get sent things.
What Is AWeber?
AWeber is the industry standard email marketing provider. Used by tens of thousands of professional sites, they make it really easy to setup and manage an email list.
The reason why AWeber is so popular is because they offer plenty of useful features that you can use. Let’s take a look at some of them.
Easily Create Signup Boxes (Web Forms)
To let people to sign up, you need to have a sign up box visible on your site. AWeber makes this really easy to do, even allowing you to create multiple sign up boxes (or ‘web forms’ as they are formally known) for different areas/pages of your site.
Simply log into your AWeber account and go to ‘Sign Up Forms’ and click ‘Create A Sign Up Form’.

This takes you to the ‘Web Forms Editor’ where you will actually create your signup box. There are plenty of templates that you can use/edit or you can create your own from scratch. Either way, you design them using the same process.
Check your ‘Form Type’ settings to alter the width of your signup box. This is important as you need to make sure that it is the right size for your site. Think about where you want the box to appear on your site. For the sidebar, you want it reasonable small (perhaps 250-300px wide). If it’s for after your post, maybe something much wider (e.g. 600px).
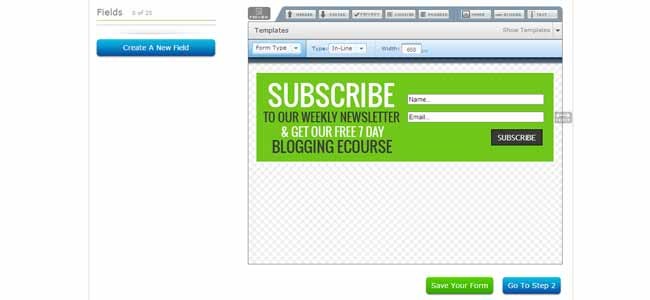
Simply work your way through each dropdown tab editing the web form as you go. The key points that you NEED are;
- Form Type Labels (i.e. Name, Email),
- Subscribe/Submit button (you can edit what the button actually says),
Everything else is optional really, but those are the features that you must include in order for your web form to work.
It’s good to include information about what people are subscribing too, or at the very least a link to a page where they can read more about it. This is where landing pages come in – learn more about landing pages.
Lastly, think about the look of your web form. It needs match up with your website (i.e. branding, fonts, colours, etc.), but at the same time stand out so that people notice it. Try creating a couple of different web forms and test out each one to see which works best.
Quick Note: Static web forms are not the only type of signup box that you can create. Check out our post on how to create a lightbox form and learn why one of these can greatly boost your subscriber rate.
Create An eCourse
One of the best features of AWeber is the ability to create a series of emails that are automatically sent out to new subscribers. This allows you to create an eCourse or some sort of introductory guide for your latest subscribers. This is fantastic as you can market it as an incentive for people to subscribe (e.g. subscribe and get our free 7 day eCourse) and once setup, you can leave it to be sent out automatically.
So, when a new person signs up to your site (via your newly created signup box), they will (after confirming their subscription) start to receive the set of emails that you have setup. You can create as many as you want and schedule them to be sent out at different intervals (i.e. 1 a day, 1 a week, 1 a day and then another one in a month’s time, etc.).
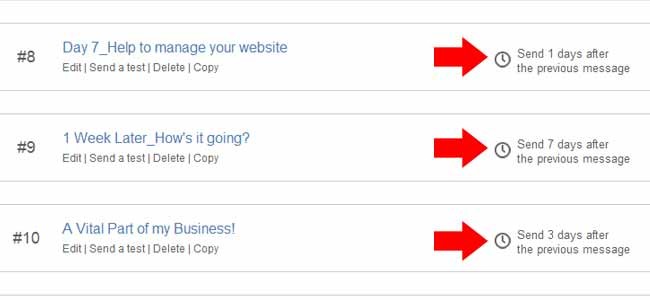
To do this in AWeber, go to ‘Messages > Follow Up Series’ and click on ‘Create A Follow Up’.
Just like when creating the web forms, there are lots of templates that you can choose from to create your email follow up. Alternatively, you can design your own pretty easily by using the simple options provided.
Make sure that you clearly brand you emails. That way, subscribers will be in no doubt who they are from, plus it makes it look a lot more professional. A good tip is to add links, not only back to your main site, but also to your social media profiles. That way, you are giving people even more ways to stay in touch with you.
Create Newsletters/Broadcasts
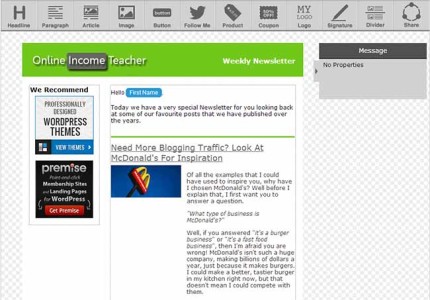
As well as an eCourse, you can choose to send out broadcasts to your email list whenever you want. These will be sent out to everyone at the same time, so they are useful for promotions, offers, site updates, etc.
Instead of simply sending out a broadcast sporadically, why not choose to create a newsletter. That way, you can send one out each week/month that includes said promotions, offers, site updates, etc. in one place. That way, subscribers won’t get annoyed of you sending out too much content to them, as they can expect to get everything in your regular newsletter.
Newsletters are created in the exact same way that follow up emails are done. To learn how we put together our newsletter, check out our post about setting up a newsletter in AWeber.
AWeber Summary
AWeber is a fantastic tool to have in your arsenal. As well as all the features that we have listed above, you will be able to view detailed reports to see how your; opt-in, click-through rate, new subscribers, etc. are performing, setup slit testing to see which of your opt-in boxes works most effectively, manage all your subscribers and much more!
I suppose the key question that you should be asking yourself is whether you can afford NOT to be using email marketing on your site.
Do you use AWeber to manage your email list? If so, what features do you find most useful? Do you have any questions about setting up AWeber that you need help with? Please let us know in the comment section below.

CommentLuv vs Disqus – Why I Don’t Use CommentLuv!