Today, I thought I would share how “I” write a blog post for my site. Now, there are many different types of posts (be it; tutorials, reviews, interviews, top lists, etc.) that you can write, but I find that I tend to plan out and write them all in a similar way. Everyone is different and will have their own approach to their writing, there is no “right” or “wrong” way to write a post, but I thought it would be good to share my own method to either help you or give you a different perspective on blogging.
How I Write A Blog Post
Think Of An Idea
First things first, you need an idea for your post. Believe me, it’s much easier to sit down and start writing once you know what you want your post to be roughly about.
There are many ways to come up with an idea. You can think of things when working on your site, whilst chatting to a fellow blogger, by answering people’s questions, etc. I’ve even had ideas just pop into my head whilst shopping or on the train. That’s why it is very important to jot down your ideas when you get them.
I use Evernote to write down all my post ideas. This way, I can make a note of my post ideas before I forget them whether I am at my Laptop or out and about with my Smart Phone. I have a dozen or so ideas written down right now on my Evernote account that I can keep going back to when I need inspiration for a post. I got the idea for this very post whilst on the way to the Cinema (don’t ask me why I thought of it then).
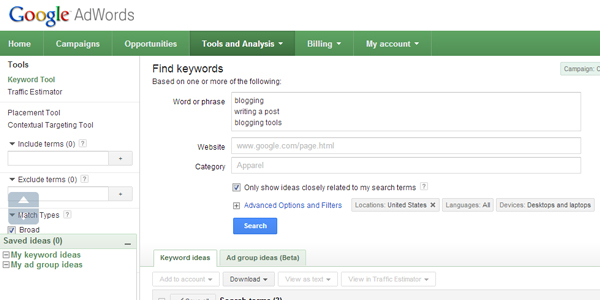
I tend to think up ideas for posts myself, but when I am struggling for inspiration, the first stop I make is the ‘Google AdSense Keyword Tool’. This is a fantastic tool (one that will get mentioned more than once in this post) as it enables you to find what people are searching for.
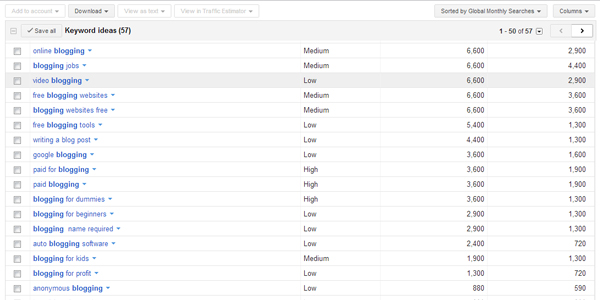
I can enter in a few words or phrases that I may be interested in and see what pops out. For example, if I enter in; ‘blogging’, ‘writing a post’ and ‘blogging tools’, I get a load of related results that people are searching for. A quick scroll down to look through some and I can usually find some inspiration. ‘Video Blogging’ could be something that I could write about in the future. I will add that to my list!
Start With A Rough Plan
So you should have your idea (mine being ‘How To Write A Blog Post), now you want to roughly plan out your post. I always do this as it helps me organize my thoughts and helps me structure what I want to say.
“Failure to prepare is preparing to fail!”
Whenever we write, we run the risk of waffling. Waffling is bad! You can end up going off topic and end up losing your readers interest. That ultimately ends up with them leaving your site, which is bad for business. Structuring your posts helps to avoid this and can actually improve them.
Just as stories have a beginning, middle and end, so should your blog posts. You should have a beginning (your introduction), a middle (the main body of your content, split into sections) and an end (your conclusion and call to action). Spend some time working out how to structure your post before you begin writing. Nothing is set in stone, so you can adapt it as you go along, but it will help you when you come to write your post.

How I planned out this very post before I started writing.
Structuring your post like this, as I say, will help you write your article, but it also makes your posts easier to read. People generally don’t like reading long passages of text online. The more you can break up your posts into easy to read chunks, the more you are encouraging people to read.
By splitting up your article into points like this, people will be able to skim through your post better. But why would you want people to skim through your post? Well truth is, most of us skim through posts online anyway. We are all pressed for time and don’t want to waste it reading an article that ends up going off on a tangent halfway through. By clearly structuring your article, people can see how you are guiding them, making them more likely to sit down and read through the post properly.
The added benefit to setting out your posts like this is for SEO benefit, but I will talk about that a bit later.
Write Your Introduction
Right, we have our article roughly planned out and can now begin actually writing it. The best place to start is the introduction, as this is the first thing that people will read. This is why you need to have a strong introduction, as if you lose people here; you have lost them for good.
Your introduction should give a quick summary of what your post is about. Think of it as a blurb on the back of a book. Everyone reads this before actually reading the book itself, as this gives an idea of what it is about. Similarly, no book gives the whole plot away in its blurb, so you shouldn’t give the whole game away in your introduction. Remember you are “introducing” your article to your readers.
Write out a general introduction and mention some of the things you are going to talk about in the post. I always write a rough draft of my introduction when starting a post, but I generally come back to it at the end to improve on it once the whole article is written.
Write Out The Sections Of Your Post
We can now begin to write out the main body of our article. Since you have already split up your post into smaller sections that you want to cover, it should be much easier to write.
A good example of this would be a ‘Top 10 List’ style of post. You know that you have to write something for each point 1-10, so it makes it much easier to think of something to write. A tutorial or informative post is no different. Simply split up your post into each point that you want to make and write what you want to say.
Here in this post, I split up the article into the points that I wanted to make (which I planned out earlier). That way, I know that I want to talk about each point that goes into producing an article.
I can’t really say too much more for this part as a lot depends on what you are writing about. Just try to make your points clear and easy to follow. Always remember that you are writing for your readers, not for you. What you may know, others may not know. It always helps to think from their perspective when writing a post.
Conclusion & Call To Action
Once you have written the main body of your article, it’s important to end with a brief conclusion/summary. Many people don’t do this, but I think that it is an important part of a post. It helps to pull everything together that you have just talked about and give an overall picture of what we have just learned.
This doesn’t need to be overly long, as you don’t want to be seen to repeat yourself. A general summary of the points you have made and “why” you have made them is a good guideline.
The other important aspect to add to the end of your posts is a good call to action. Once people have finished reading your post, you don’t want them to leave straight away; you want them to stay on your site. Including something like “please leave a comment below” or “why not check out our other posts” can help do this.
To encourage them to comment, why not ask them a question, such as; “do you do these steps when doing X”, “have you had experience with Y” or “what are your views on Z”. Whatever it is you ask, make sure that it relates to your post. This way, you are encouraging interaction in your comment section.
Add Internal & External Links
Now is a good time to go over your post and look at where you can include links. Links are important as they both help visitors to find your other content and allow search engines to identify what your content is about. Whatever links you add, they should be relevant to the post you have just written!
Think about past posts that you have written. Do any of those relate to what you have just said? If so, think about where in the post you can add a link that is natural. If you have written a tutorial for a piece of software, maybe you could link to the review that you wrote about it last month. Perhaps you have mentioned a technical term that you explained in more detail in a previous post. These will all help readers find your other content on your site.
What about related content from other sites. Search engines love it when you link to other quality, related content on different websites. This shows that you are providing a quality service to your readers, not just trying to hog them for yourself. Search engines will also use these links to evaluate what your post is about (as they don’t actually read a post like we do), so it’s worth linking to at least one external site where appropriate.
Add Images & Video
Now that you have finished writing your article, you can add what I like to call “window dressing”. That may sound superficial, but it actually helps to sell your article to people and encourage them to read it in the first place. Remember, people don’t like reading a mass of text online, so anyway that you can break that up by adding images and videos is a good thing!
Think about what images you can add to your article. If you have written a tutorial, what images can you add to help explain things? If you have written an informative post, can you add screenshots, metaphorical images, infographics, logos, etc. If you have conducted an interview, include pictures of the person you are interviewing.
“A picture speaks a thousand words.”
Videos can be just as effective, if not more so. If people have the choice to watch or read something, they will often rather watch something. You could include your own videos in your posts (or other people’s videos) to help explain something. If you wrote a tutorial, perhaps a video of you showing them how to do something would help explain things more easily.
Search engines love posts that include different media types. Pictures and videos help engage your readers, so they are always worth including where appropriate.
On-Page SEO
You may think that your article is finished, but there is still a vital step to complete and that is optimizing your post for the search engines!
I mentioned earlier about the ‘Google AdSense Keyword Tool’ and now is a good time to have a look at it. You may have written out your post, but you can still improve it by including relevant keywords and keyphrases that you may not have thought of initially.
Open up the Keyword Tool and enter in all words and phrases that you believe to be related to your post. Doing a quick search with this tool will help you find other targeted words/phrases to include in your post. You want to find words and phrases that have low competition from other sites, but are searched for by as many people as possible. I can’t lie, this isn’t easy, but this can make a big difference to how much traffic ends up being driven to your post.
Add your keyword/keyphrase to your title, subtitles, image alt tags, meta description, etc. where you can. Don’t over optimize, but try to add them where you can naturally.
Something as simple as adding a word to your title (in the right place) can make a huge difference. Remember, it doesn’t matter how good your article is, if no one can find it, no one will read it!
To help me with my on-page SEO, I use the excellent ‘WordPress SEO by Yoast’ plugin for my site. I can’t recommend this highly enough, it is excellent and one of the more important tools that I use. It’s very easy to use and can help you get your posts ready before you publish them.
Double & Triple Check Your Article
Make sure that you read over your post before you hit publish. Check over your article for any spelling and grammar mistakes to correct that you may have missed. You may not think that it matters that much, but readers really appreciate posts that have little or no mistakes. It shows that they value their readers and will spend that little extra time making sure everything is right.
This would also be a good time to make final edits to your article. I tend to go back and edit, or even re-do my introduction, to make it stand out. You have spent a lot of time and effort putting your article together, so don’t neglect this final stage.
When You Are Happy, Hit Publish!
Only when you are 100% happy with your post should you publish it. True, you can make changes at a later date, but it looks a lot better to your readers if you get things right to start with!
Congratulations! You now have a fantastic, good quality, optimized post published on your site. Now you just need to come up with an idea for the next one.
This Is How I Write A Blog Post
As I said at the start of this (mammoth) post, everyone has their own way of writing a blog post. This just happens to be the way I work and put together posts for my site. Hopefully it helps to show how you could approach future articles, or at the very least, give you a different perspective of how to write a blog post.
However you choose to produce your posts, the same rules should apply. Blogs should aim to publish quality articles that help and engage with their readers. Including different types of media can help with this and make them appear more visually appealing. Posts should also be optimized to a certain degree (don’t go over the top) to enable people to find it on search engines as this is by far the best way to drive traffic to a site.
Do you have a similar approach when writing your posts? If not, how do you write a blog post? What other tips would you add that I have not mentioned? Please let us know by leaving a comment below!


CommentLuv vs Disqus – Why I Don’t Use CommentLuv!